
However, Microsoft Windows 10 has many useful usability features that are not widely known, and which may increase your productivity if more widely used.
What is about Keyboard shortcuts?
Windows has a long list of keyboard shortcuts. If you try to memorize all of them, you don’t need to do all at once at least you can know the most common shortcuts. When you know the most common shortcuts without a list or cheat sheet, your confidence in using your computer will certainly increase.
1, Windows key + V (Cloud clipboard)
It is very useful and simple trick .It was introduced in the October 2018 Update for Windows 10 and adds a clipboard history of copied text clips that can be retrieved later.
Every day, we use the Windows clipboard to cut and paste, but did you know that you can save multiple items at once and paste across devices? You can view recent clippings saved to the clipboard by using Win + V. Include text, HTML, and images less than 1MB in the copy and paste.

You will be able to use the history of copying and pasting you have made someday if you press the key combo the first time.
Firstly, you can control this feature via
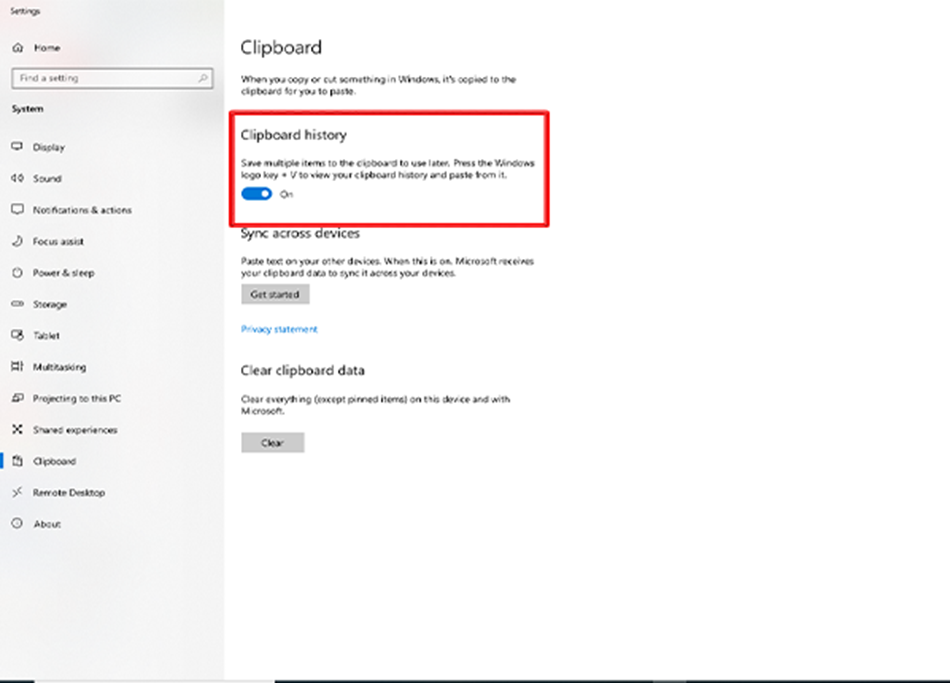
Settings > System > Clipboard and sign in to your Microsoft Account to use this feature across devices.
If using a computer or mobile device, you need the some important line in the article you can just copy and paste the line into your notepad when you read it. Which point did you have copy in order? You can’t remember that line. This is why you require a serialized and sorted list.
Use the history of your selection to paste your copy into the clipboard (Windows +V).

2, Windows key + TAB (Multitasking view)
It is common knowledge that the “Alt + Tab” shortcut can switch between windows, but perhaps some of you don’t know that you can also press the “Windows Logo + Tab” key (next to the “Alt” key) for the same result.

Command: Windows Key + Tab Button – If you press this key combination, you can use your mouse to drag a window to the desktop icon at the top of the screen to move the window to another virtual desktop (thumbnail view), as well as a list of those that have recently closed, sortable by date.

It provides a quick overview of all the windows currently running and allows the user to close or switch between them.
3, Windows key + Period (.) (Add Emoji icon)
This is another useful trick for windows 10. Windows 10 users can open the emoji keyboard with the shortcut keys [Win+.] and [Win+;], but tablets and mobile users can use emojis by tapping the smiley face [ ] on the keyboard.
It has never been easier to express yourself with Windows 10’s new emoji keyboard.

1, when you text entry, type Windows logo key + Semicolon key (;).The emojis will appear.

2, You can select an emoji with the mouse or keep typing to browse through all the available emojis
4, To stop automatic windows update in windows 10
Most of peoples don’t know about these tips. Microsoft Windows installs software updates automatically so that the device has the latest features.
Did you wonder why you would want to know how to turn off automatic updates in Windows 10?
Basically, updating your system is essential to keeping it secure and stable as well as introducing the newest features and improvements?
You may be interrupted while working by automatic updates, prompting you to restart so they can be installed.
Most of times Windows update is very annoying and its break the system.
Here the some steps followed to disable windows 10 automatic updates
1, Go to search options

2, Type to search services and click ok to open service window

3, When the service window open scrolls down find out window update service and double click it.
4,In the properties window change the startup type Automatic to disabled.

5,Then change the service status to stop Click OK or Apply to disable automatic windows.
When you have completed all the steps, you can restart your computer to stop Windows 10 updates.
5, Windows key+ G (Record your screen)
On a laptop or computer without installing any external software using a screen recording tool is inbuilt. Almost all of us fail to notice the inbuilt screen recording features in Windows 10.
Xbox Game Bar is a screen recording application that comes preinstalled in Windows 10. You may record your screen, capture screenshots, and even broadcast live game footage. You can record anything for your computer.
Here are the screen recording steps to follow.
1, If you want to record your actions can use your desktop, browser, a video game, or even a movie you are watching online.

2, If you are press the Windows key + G keys together, you will see an over lay of the recording program on your screen .The overlay has several widgets, such as audio and performance.


3, Click on the record button in the capture widget to start recording.

4, Just click anywhere on your screen to hide the game overlay. Now you will see a small bar along the right edge of the screen, which shows the time you are currently receiving time.
You can also stop recording at any time, and turn the microphone on or off if you have one. When you have finished recording, click the stop button on the small widget.

5, you will receive a notification of game clips recorded. The video file you just recorded will appear in a folder in windows explorer once you click it.
Finally, simply press the Windows key + Alt + R to start & stop recording videos on the computer.
6, Windows key +Shift +S (Snipping & Sketch)
Over the years, there have been a variety of ways of taking screenshots in Windows, but since it’s the Snipping Tool has become more popular, making it much easier to take images of apps. Use the Win + Shift + S keyboard shortcut to open the snipping toolbar

If you want, you can either take a screenshot of the whole computer screen or just a part of it.
Here the steps to use Snipping & Sketch
1,Press the Windows key + Shift + S to view a snipping toolbar that lets you select a rectangle, something more windows snip, free-form, or full screen to copy the screenshot directly to your clipboard.

2, When you’re done choosing an area, release the mouse. You can annotate and share screenshots after taking them with Snip & Sketch.

These screenshots will be copied to the clipboard. Additionally, you can paste the screenshot image into an image editing software such as Photoshop and save it in the format you prefer

Finally, the images are saved to the document’s Pictures folder by default.
7, Windows Key + X (Open second start menu)
Do you know that Windows 10 has two different Start menus? In Windows 10, you can access advanced tools like Command Prompt, PowerShell, etc. through a lesser-known secondary start menu.

Using the combination of Windows Key + X will launch the secret start menu. Alternatively, you can right-click the Start button to open a secondary start menu.

The features you gain access to include also, Task Manager, File Explorer. Hopefully, you now know about these microsoft Windows 10 trick, and if not, you can thank us afterwards.
8, Windows key + Direction keys (Snap 4 Windows One Under Another)
You have been able to snap two windows up to now, but how about snapping four? Imagine you are validating the facts of two websites while simultaneously referencing the third site on your blog.

Aligning all four windows first requires clicking on the Windows key + right/left arrow key. This will snap two windows side by side.

Once you have placed the cursor on the Windows you want to snap another window to, press Windows key + up/down arrow key.
For example, suppose you’re typing text into a browser tab from a document. Then you can open both at the same time.
9, Windows key +H (voice dictation)
Typing with your voice in windows 10
With Micro soft Windows 10, you can transcribe spoken words into text anywhere on your PC, dictation uses speech recognition, which is built into the operating system, as there is nothing you need to download or install.
If you want to start dictating, select a text field and press Windows logo key + H to open the dictation toolbar. Then you can say anything you want. To stop dictating at any time, say “Stop dictation.”
Here’s an example of dictating into a blank text document: When you hit Windows + H, the dictation window will appear on the screen:

In reality, Speech Recognition was primarily created to assist people who cannot use a mouse or a keyboard.
If you use your voice for dictation you will be able to write things faster and more easily than if you typed them. Dictation is also fun!
10, Dark mode or Night mode
Microsoft Windows 10 comes with the Dark mode by default to avoid eyestrain from a bright screen. If you wish to switch from Light mode, simply navigate to the Personalization settings. Please note that your Windows copy must be activated to make the change.
Color schemes are applied to the Start menu, taskbar, action center, File Explorer, settings menus, and any other programs that support them.
The whole idea here is to reduce the light emitted from the screen of these devices in order to protect your eyes.
It looks very neat and exclusive. Here’s how to use it.
What is the process for switching to the Dark theme?
1, Choose Settings in the Start menu
2, Open personalization
3, Then, Click Colors in the left pane, and then pick Dark from the Color drop down menu.
4, During the next few seconds, the system will change all the windows to the Dark mode. Change your mind by selecting the Light or Custom color option in this menu.
5, when using the Custom color theme, you can only switch to Dark mode on the system or on the apps.
